
In this article I'll walk you through all the steps involved in setting up a highly available Drupal deployment in Amazon's Web Services (AWS) cloud hosting environment. As you will see there is quite a bit involved, and this is just to get things set up up initially, but I aim to give you a step-by-step guide that you can use to navigate the necessary services in AWS along with commands you can copy and paste to get drupal up and running in the Amazon Linux 2023 operating system (OS).
Basically the environment will consist of an Application Load Balancer (ALB), two or more Elastic Compute Cloud (EC2) instances, an Elastic File System (EFS), and a Relational Database Service (RDS) instance. The EFS provides shared file storage for the EC2 instances to access, while the RDS instance provides the MySQL database that Drupal will use, and the ALB distributes incoming web traffic to the EC2 instances. It is critical to understand that each of these components will bet setup with redundancy and fail-over capability across two or more Availability Zones (AZs) in a single AWS Region.
A quick disclaimer, security best practices will not be covered in this guide. Those may depend on your specific use case or company requirements, and can also change over time. I will instead illustrate the most basic setup to get everything communicating and working properly.
Setup MySQL RDS Database
We will start from the back end and work our way forward, so to speak. I'm going to assume you have your Virtual Private Cloud (VPC) networking environment already configured as you require, and that includes subnets in more than one AZ. For this tutorial I will be simply using the default VPC that every AWS account starts preconfigured with by default.
Let's create a subnet group that we will use to specify which AZs and subnets our RDS instance will be allowed to use. In the AWS web management console, go to the RDS service. In the RDS menu, click on Subnet groups, and then click the button labeled Create DB subnet group.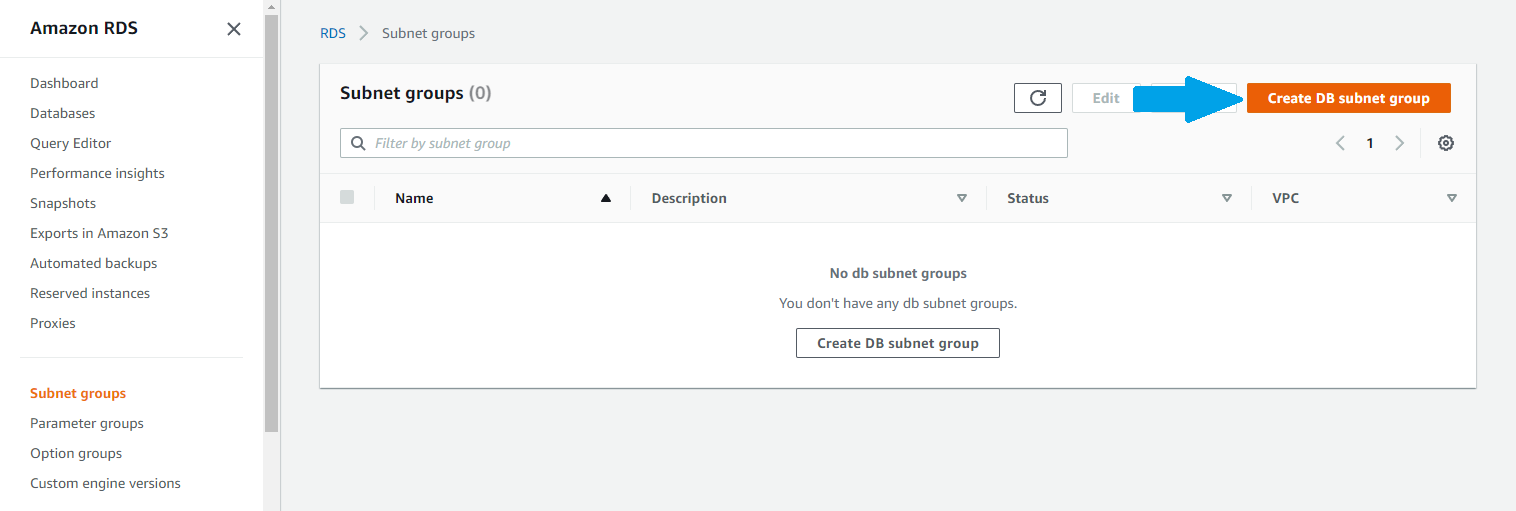
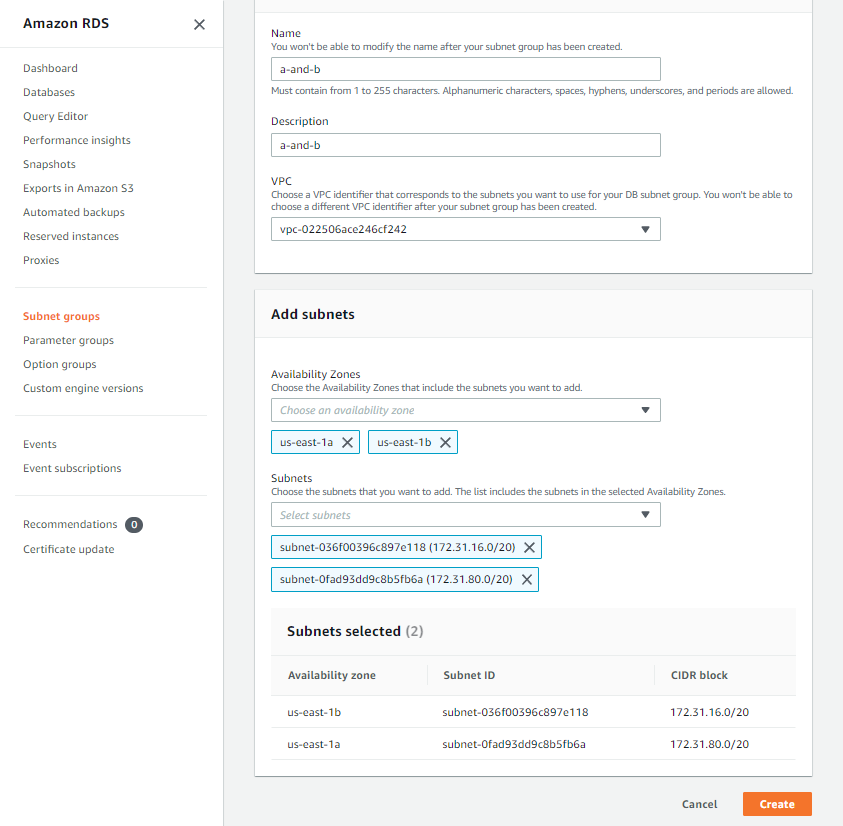
Provide a Name and Description for your subnet, choose the VPC your RDS database will be running in from the drop-down list, select two or more Availability Zones from within that VPC, and at least one subnet from each AZ in the Subnets drop-down. Then click the Create button.
Before we continue, you will have to decide which relational database management system (RDMS) you want to use. You may want to refer to the Drupal documentation regarding database requirements, which is at https://www.drupal.org/docs/system-requirements/database-server-requirements. You will see that PostgreSQL is an option for use with Drupal 10, but I'm going to be using MySQL for this example because it has been compatible for use with Drupal for longer than PostgreSQL and therefore may be easier to configure and use with Drupal. SQLite is also an option, but AWS does not have an RDS implementation of SQLite so that isn't an easy option for High Availability (HA) with redundancy and fail-over in an AWS environment.
Now let's create our own custom parameter group that our MySQL RDS database will use. There is one setting we need to change away from the default to work properly with Drupal. We're still within the RDS section of the AWS console, so we'll just click on Parameter groups in the menu, and then click the Create parameter group button.
Here you will have to make another decision. For this example I will be using MySQL 8 Community Edition, but you need to know whether you want to use Amazon's proprietary Aurora implementation of MySQL, or the standard open source implementation of MySQL as I will be doing here. Aurora provides the potential for more throughput than standard MySQL and also has serverless implementation options which can automatically grow and shrink resources on-demand. It is up to you to determine which is more appropriate for your use case and budget considerations. The standard MySQL RDS option includes server instance types that are smaller and therefore cheaper compared to the server instances types or serverless options available with Aurora MySQL.
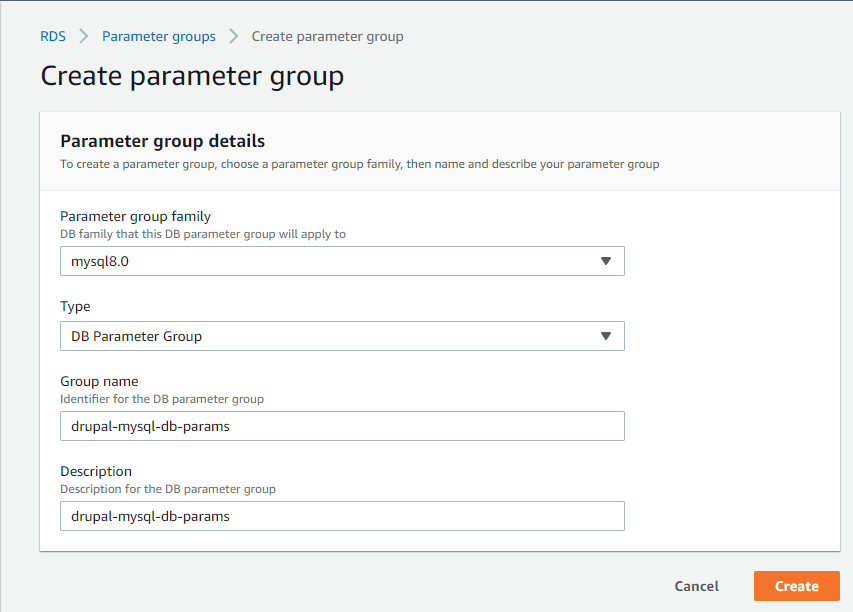
I will choose mysql8.0 from the Parameter group family drop down list. If you will be using Aurora for MySQL, then choose aurora-mysql8.0. We will leave the type as DB Parameter Group. I will use drupal-mysql-db-params for both the Group name and Description. Then click Create.
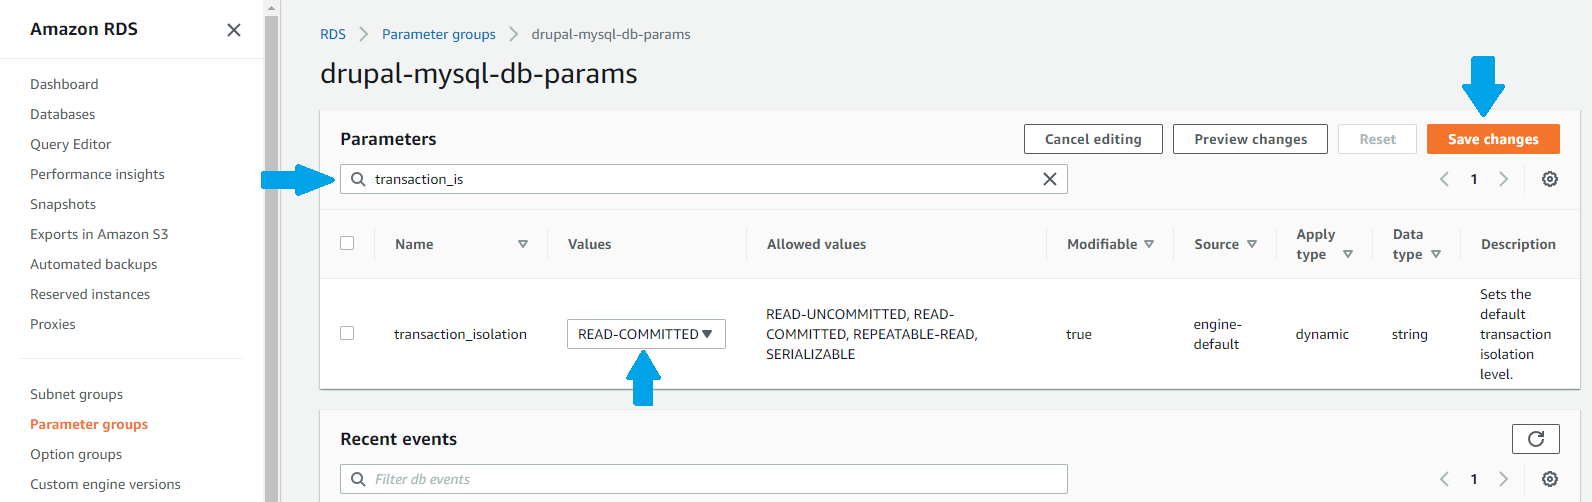
Now we will see the parameter group we just created listed along with any others that may exist in the region and account you're working in. Let's select our newly created group by clicking on it, then we will search for the parameter named transaction_isolation by typing that into the search box. Edit the parameter by clicking the Edit parameters button. The Values column will show a drop down menu, from which we will select the READ-COMMITTED option. Finally we will click the Save changes button.
If you chose to use Aurora for MySQL then you will need to do the same as we just did for the DB Parameter Group, only this time you will chose DB Cluster Parameter Group from the Type drop-down when creating the parameter group. You will have to go into this cluster parameter group and change the transaction_isolation parameter value to READ_COMMITED there as well.
Now click Databases in the menu of the RDS console and then click the Create database button. There are many options when setting up an RDS instance, if I do not mention the option then leave it at the default setting.
Select the MySQL Engine option that corresponds to the database implementation decision and parameter group(s) that you have made. I'm going with MySQL, though Aurora (MySQL Compatible) is a valid option for use with Drupal 10. In the drop-down labeled Engine Version I recommend choosing the highest version number, which is currently MySQL 8.0.32.

In the Availability and durability section choose Multi-AZ DB instance. This will give us a second server instance in a separate AZ that will become the primary in case there is an issue with the with the normal primary. Unlike the cluster option, this secondary server instance won't be available as a read replica during normal operation, though you can add read replicas later on with this option. Information on how to configure Drupal to use read replicas can be found at https://www.drupal.org/forum/support/module-development-and-code-questions/2016-09-09/master-slave-db-configuration-with and https://stackoverflow.com/questions/19911511/read-replica-configuration-in-drupal.
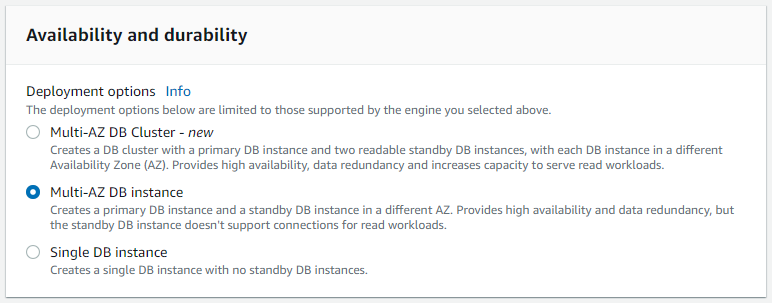
Choosing the Multi-AZ DB Cluster option would work just fine, but it would be more expensive because it would spin up three separate server instances, two of which would be read replicas that don't offer any performance benefit with Drupal. If you want to have database redundancy across three or more AZs then you can chose this cluster option.
In the Settings section, set a name for your RDS instance in the text field labeled DB instance identifier. I'll be using mysql-drupal. Set the master username and password. You can choose to have the password managed automatically in AWS Secrets Manager, but be aware that if you're using Aurora or the cluster option, then you will not be able to add read replicas later on if Secrets Manager is handling the password. I'll be managing the password myself and making sure to store it securely so that I can access it in the future.

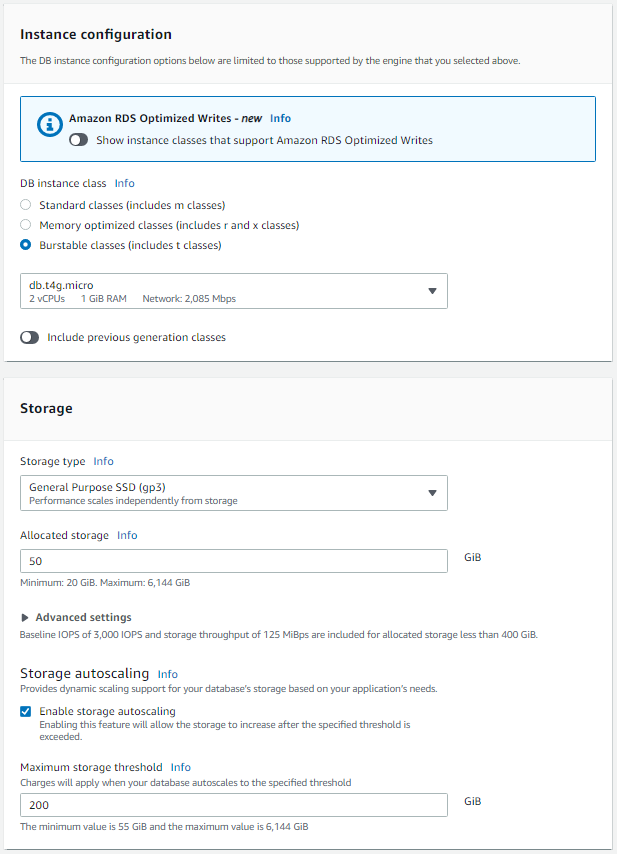
In the Instance configuration section I am selecting an instance type from the Burstable classes which is db.t4g.micro. For the Storage section I am choosing the storage type of General Purpose SSD (gp3) and allocating 50 GiB of initial storage space. Both of these options offer good performance for a demo at reasonable prices. GP3 storage is also suitable for most production requirements. You may want an instance type larger than db.t4g.micro for a production environment, but remember you can always upgrade the instance type of your RDS instance once it is up and running. I am also setting the Maximum storage threshold for storage autoscaling to 200 GiB.
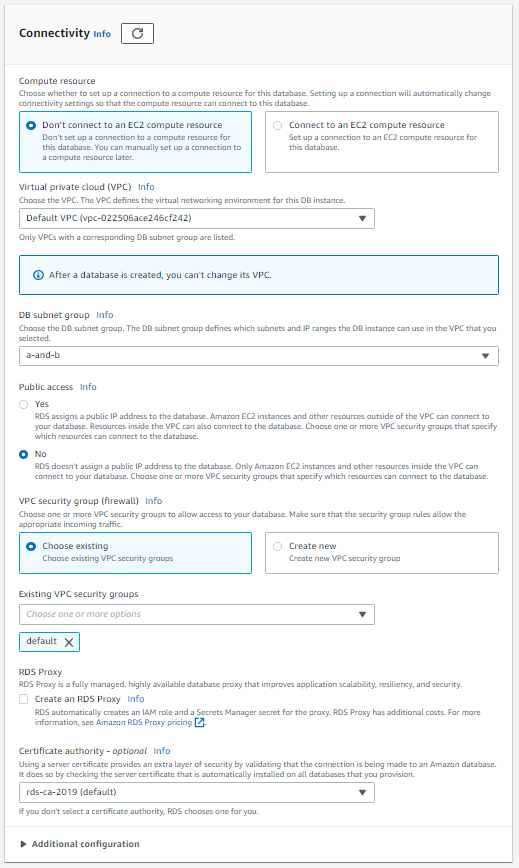
In the Connectivity section, select the appropriate Virtual private cloud (VPC) and the DB subnet group that we created earlier.
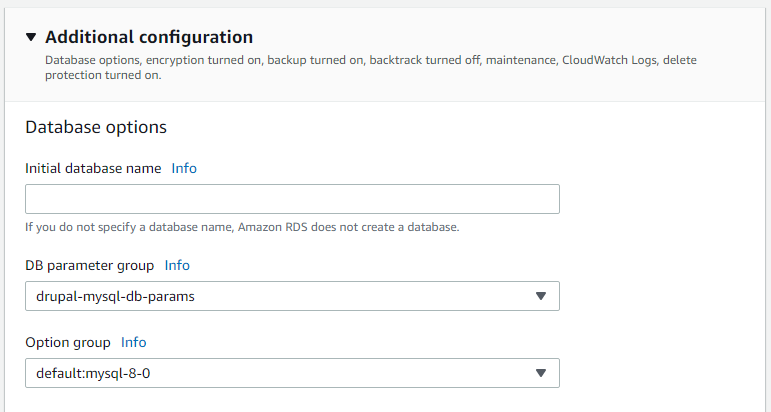
Click to expand the Additional configuration section and select the parameter group(s) we created earlier, in my case this is drupal-mysql-db-params. Under Log exports, I am selecting to have Error log and Slow query log exported to CloudWatch logs. You may want to specify a time window when database maintenance will be performed.
Click the Create database button and watch the progress as your multi-AZ RDS instance is provisioned and activated. While waiting for that we can create an EC2 instance that we will use to create the MySQL user and database within the RDS instance that Drupal will be using.
In the AWS web console, go to EC2. In the menu, click on Instances and then click the Launch instances button.
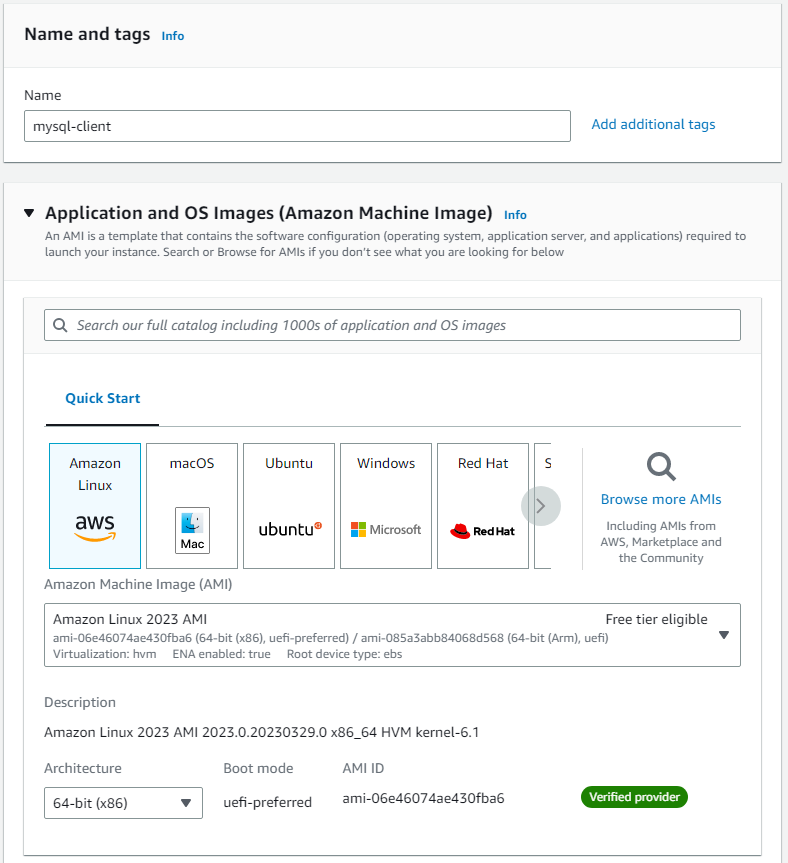
Provide a name for the new EC2 instance, I will be using mysql-client. Choose the Amazon Linux 2023 AMI.
For Instance type I'm going to select t3.micro. We don't need many resources for this EC2 instance. We're just going to use it to create the database and use within our RDS instance that Drupal will use. After that we will be shutting down this EC2 instance.
For the Key pair, either use a key you've already created and have access to, or click Create new key pair. For storage let's go with 20 GiB of gp3. Then click the Launch instance button.
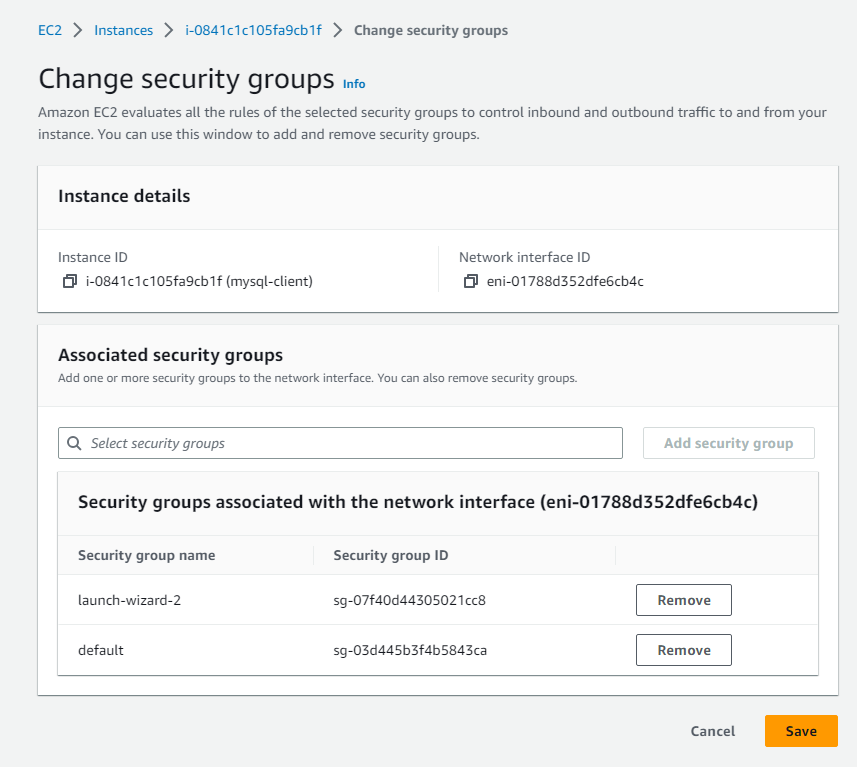
Once your EC2 instance is Running, select it in the AWS console and then click Actions, then Security, then Change security groups. In the search box in the Associated security groups section, type in default and click on the default security group, then click Add security group, and finally Save. This is assuming that you left the default security group assigned to the RDS instance when creating it, as I have done in this guide.
Check to make sure your RDS instance has finished creating and is in the Available state. Once the RDS instance is ready to go, select the EC2 instance in the web console and click Connect. If your EC2 instance has a public IP address, as I have setup here in this example, then you can use EC2 Instance Connect. If not then you'll need to have a VPN setup and access the private IP of the EC2 instance with an SSH client such as Putty.
Once connected to the EC2 instance, run the following command to install mysql :
sudo dnf install -y mariadb105Now we can connect to our MySQL RDS instance. To find the host name to use when connecting to the RDS instance, go to Databases in the RDS web console, click on the RDS instance we created, and in the Connectivity & security tab you will see the Endpoint name of the RDS instance. Copy this for use from within the EC2 instance we've created.
In the linux terminal of our EC2 instance, use this command to connect to the RDS instance, where [rds-endpoint] is the endpoint name we copied from the RDS console :
mysql -h [endpoint] -u admin -pEnter your MySQL super user password. At this point you should see a prompt labeled MySQL [(none)]> rather than the usual linux prompt. Now issue these commands to create the MySQL database and user as described in the Drupal documentation at https://www.drupal.org/docs/installing-drupal/step-3-create-a-database.
CREATE DATABASE drupaldb CHARACTER SET utf8mb4 COLLATE utf8mb4_unicode_ci;
CREATE USER 'drupal'@'%' IDENTIFIED BY 'somePW';
GRANT SELECT, INSERT, UPDATE, DELETE, CREATE, DROP, INDEX, ALTER, CREATE TEMPORARY TABLES ON drupaldb.* TO 'drupal'@'%';
FLUSH PRIVILEGES;
Congratulations, you now have a redundant, highly available MySQL RDS database with automatic failover capability across multiple geographic locations that is configured and ready for Drupal 10.
Setup Elastic File System
In the AWS web console, go to the EFS service. In the menu there, click on File systems and then Create file system. Provide a name and select the proper VPC, then click Create. For this example I will use the name drupal-fs.
If you click on your newly created EFS instance, you can go to the Network tab and see that a mount target is being created in each AZ of the VPC you chose. Once those mount targets are Available you're ready to go. That is all there is to it for now. You may want to alter the Lifecycle management or Throughput mode if you find the need in the future, or if you know you have certain requirements where those settings would be beneficial.
Setup EC2 Instance with Drupal 10
Now it's time for the good stuff. Let's spin up an EC2 instance, mount our EFS instance to it, get Apache and Drupal installed on it, and then configure Drupal.
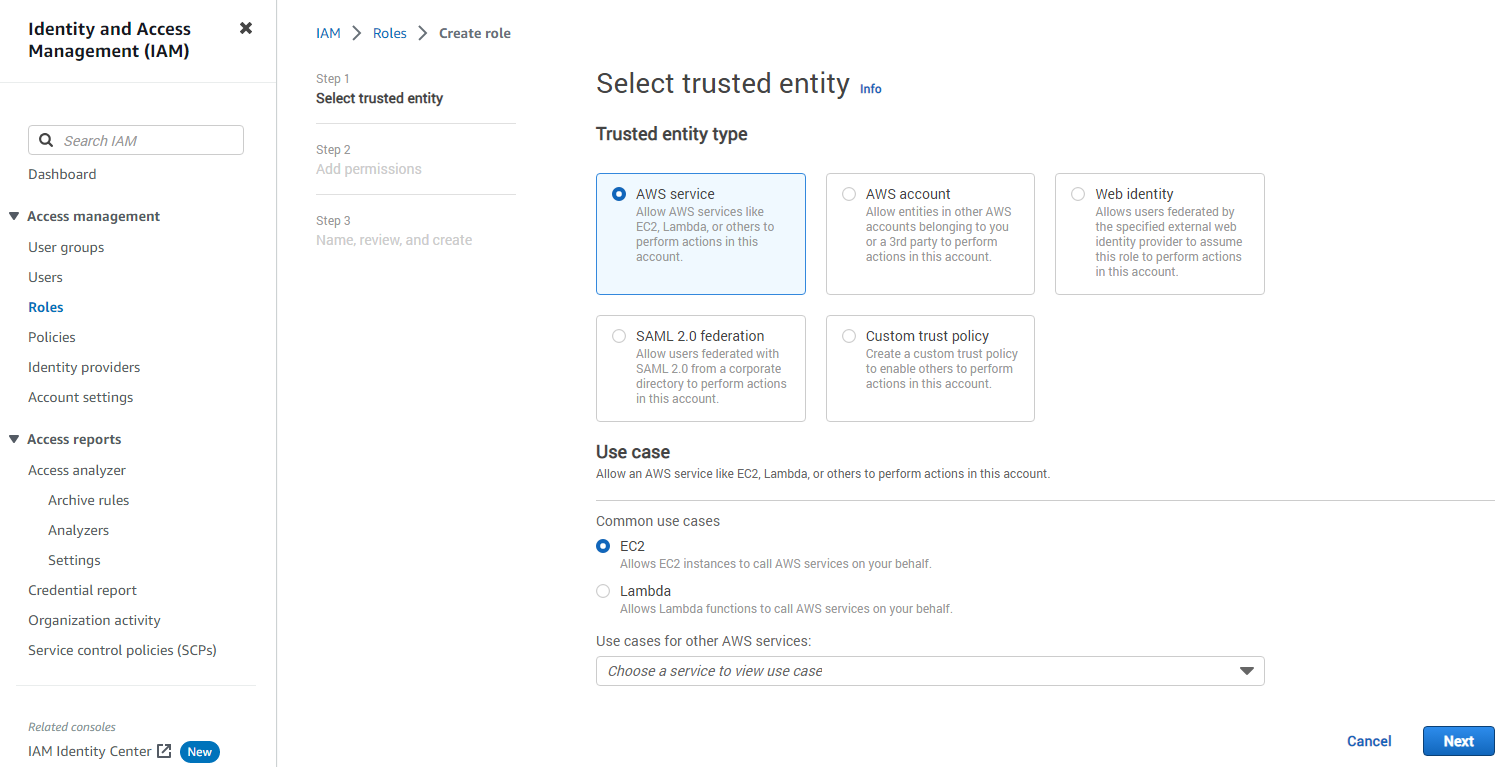
First we will setup an Identity and Access Management (IAM) role that we'll use for connecting our EC2 instances running Drupal to the EFS we created. In the AWS console go to the IAM service, click Roles in the menu, and then click Create role. The Trusted entity type will be AWS service and Use case will be EC2. Once those are selected, click Next.
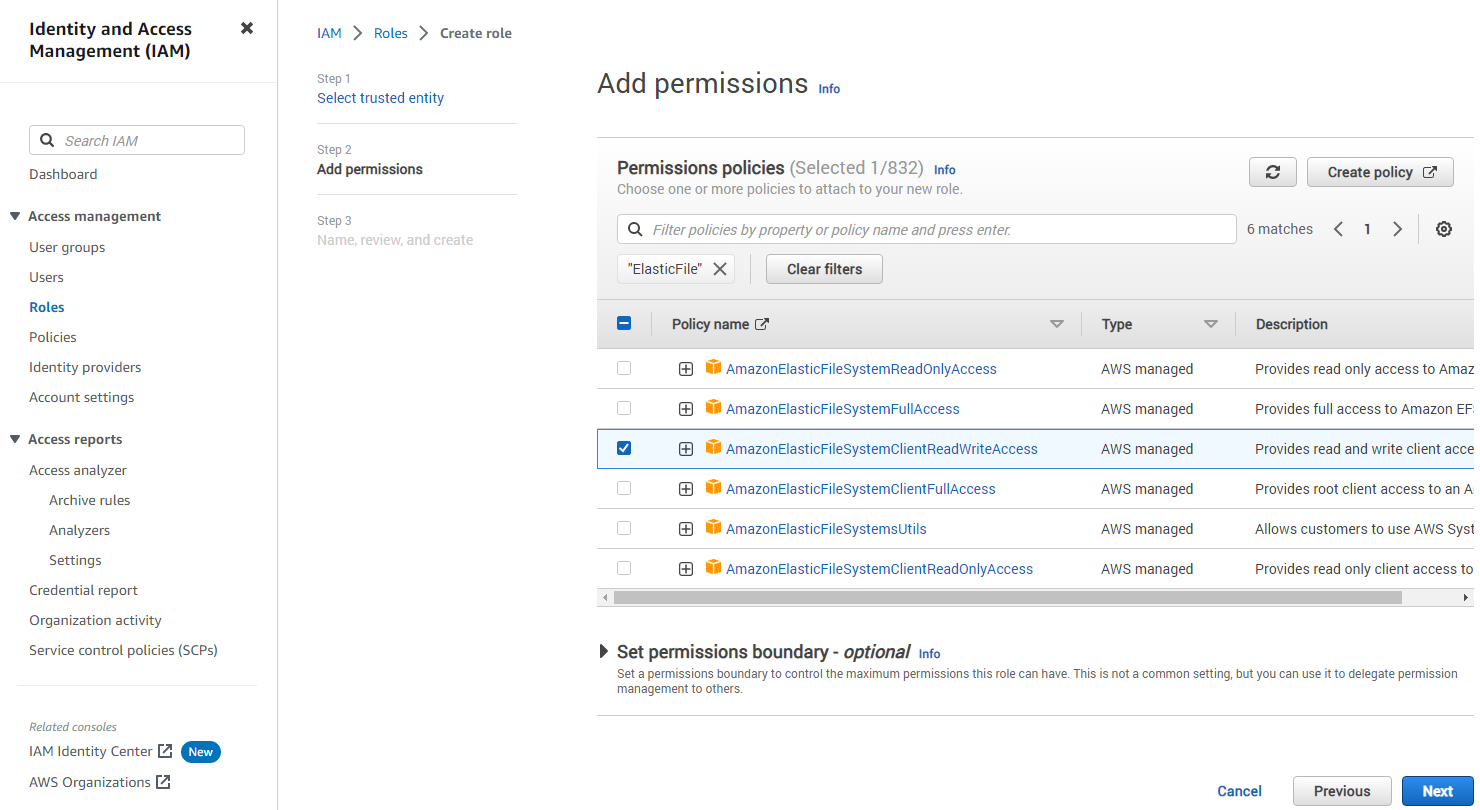
On the Step 2 page, search for ElasticFile and then check on the box to select AmazonElasticFileSystemClientReadWriteAccess. Then click Next.
For Step 3 we will provide a Role name, I'll use ec2-drupal-role. Scroll down and click the Create role button and then we'll have the IAM role that we need.
Go back to the EC2 service in the AWS console, select Instances in the menu and once again click Launch instances. Provide a Name that will allow you to differentiate this instance from other EC2 instances running Drupal that we will create in the future for redundancy. I'm going to use the name drupal-a.
Let's again use the Amazon Linux 2023 AMI, Instance type of t3.micro, select the same Key pair that was used for the MySQL EC2 instance, and 20 GiB gp3 storage. You probably want to click the Edit button in the Network settings section and specify in the Subnet drop-down a subnet that corresponds to an AZ in the subnet group of the RDS instance you created so to avoid some cross-AZ data transfer charges.
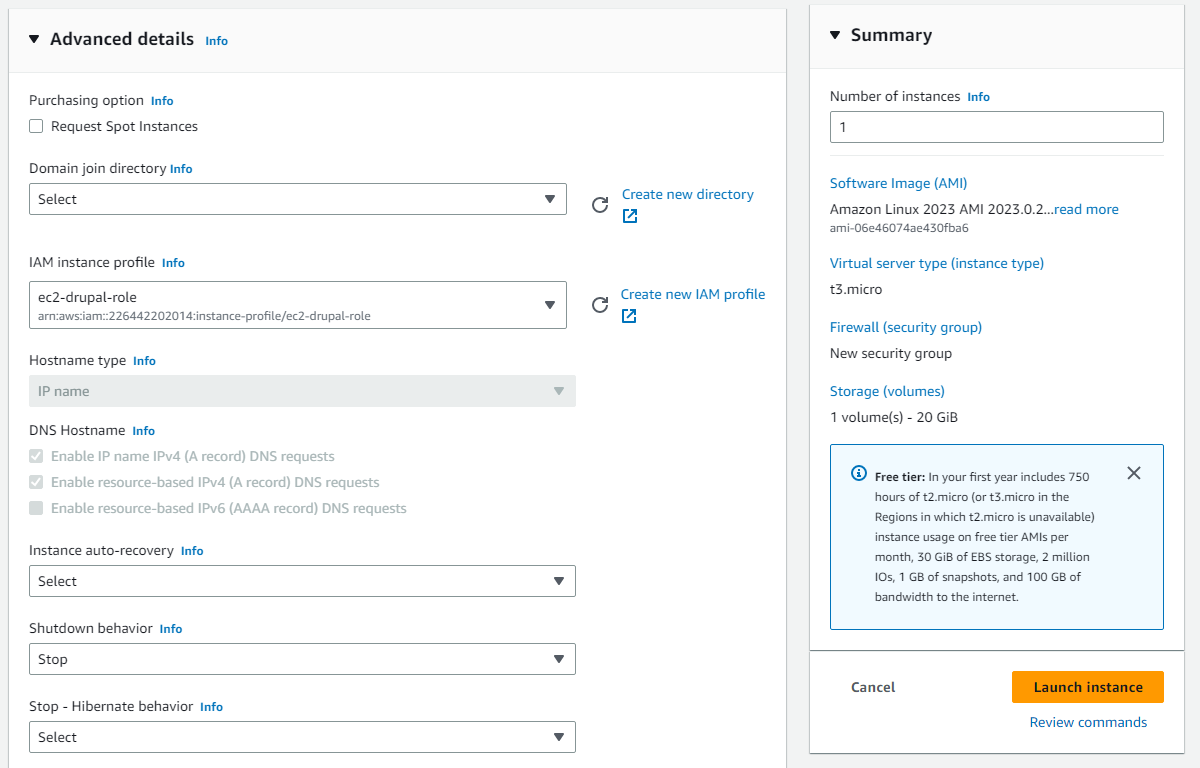
Click to expand the Advanced details section, and select the IAM role you created from the drop-down list named IAM instance profile. Then click Launch instance.
Assign the default security group to the drupal-a EC2 instance by selecting the instance, clicking Actions, Security, Change security groups. Find the security group named default, add it and save the changes as we did with the previous MySQL EC2 instance.
Once the new EC2 instance is Running, connect to it and we will mount the EFS instance we created earlier according to the documentation at https://docs.aws.amazon.com/efs/latest/ug/installing-amazon-efs-utils.html and https://docs.aws.amazon.com/efs/latest/ug/automount-with-efs-mount-helper.html. We're going to be using the EFS Mount Helper rather than linux native NFS because the Mount Helper will allow us to simply specify the EFS instance, and then it will automatically use the mount target in the same AZ as our EC2 instance. So when we create multiple EC2 instances from an image of this one, the EFS access will be properly distributed without us having to make any changes. This is documented at https://docs.aws.amazon.com/efs/latest/ug/efs-mount-helper.html#mount-helper-prerequisites where we see : The EFS mount helper resolves the file system ID to the local IP address of the mount target elastic network interface (ENI) without calling external resources.
Now, on our EC2 instance we can install the EFS Mount Helper :
sudo dnf install -y amazon-efs-utilsLet's make a directory that we will mount the EFS instance to. This will serve as the directory we install Drupal to, so I'll be using /drupal :
sudo mkdir /drupalOpen the linux fstab file for editing :
sudo nano /etc/fstabCreate a new line of text at the bottom of the fstab file. Copy the File system ID of your EFS instance from the AWS console and use it in place of [fsID] below. Here is the line to add to the /etc/fstab file :
[fsID]:/ /drupal efs _netdev,tls,iam 0 0Press CTL+X on your keyboard to exit the nano file editor. When prompted, press y to save changes, then hit ENTER to keep the same file name.

Now back at the linux command prompt, mount everything as described in the fstab file :
sudo mount -aTake a look at the mounted file systems using :
df -hIn the first column of output, named Filesystem, you should see 127.0.0.1:/ corresponding to /drupal. That indicates that the EFS instance is indeed mounted to the /drupal directory. This will happen automatically on start-up from now on since we edited the fstab file.

Let's change the owner of the /drupal directory to our ec2-user so we don't need to use sudo when installing the Drupal codebase with Composer.
sudo chown ec2-user:ec2-user /drupalNow let's install Apache and PHP along with the GD, MySQLi, pear, and devel modules for PHP :
sudo dnf install -y php8.1 php8.1-gd php-mysqli php-pear php-develInstall the APCu PHP extension :
sudo pecl install APCuWhen prompted about enabling debugging in APUc, just hit ENTER to accept the default value of no.
Create a new file in /etc/php.d that will load the APCu extension when PHP initializes.
echo 'extension=apcu.so' | sudo tee /etc/php.d/40-apcu.iniNext we'll install Composer, which is the recommended tool to use for installing Drupal according to the documentation at https://www.drupal.org/docs/develop/using-composer/manage-dependencies.
Make sure you're working in the ec2-user home directory :
cd ~Download the latest Composer installation file :
php -r "copy('https://getcomposer.org/installer', 'composer-setup.php');"Check the downloaded file against the known good file hash (refer to the documentation at https://getcomposer.org/download/ to get the proper hash for the latest install file) :
php -r "if (hash_file('sha384', 'composer-setup.php') === '55ce33d7678c5a611085589f1f3ddf8b3c52d662cd01d4ba75c0ee0459970c2200a51f492d557530c71c15d8dba01eae') { echo 'Installer verified'; } else { echo 'Installer corrupt'; unlink('composer-setup.php'); } echo PHP_EOL;"Run the PHP file to install Composer :
php composer-setup.phpDelete the Composer installation file now that we're done with it :
php -r "unlink('composer-setup.php');"Move the composer.phar file that was generated by the installer to the bin directory so we can use Composer from the command line without having to specify the full path every time :
sudo mv composer.phar /usr/local/bin/composerNow install Git, which Composer will use to download the latest version of Drupal for installation :
sudo dnf install -y gitUse Composer to install the latest codebase of Drupal. I've added more verbose output and eliminated the default timeout because a brand-new EFS instance like the one we're using is fairly slow, but the performance will be boosted as the EFS grows :
COMPOSER_PROCESS_TIMEOUT=0 composer create-project drupal/recommended-project /drupal -vvvYou will have to wait for several minutes during at least one of the rm -rf commands that get executed. If you're connected with Putty, you may want to press ENTER on your keyboard every couple of minutes to prevent the Putty client from timing out while the installation runs.
When the that the Drupal installation has completed you should see output similar to this :
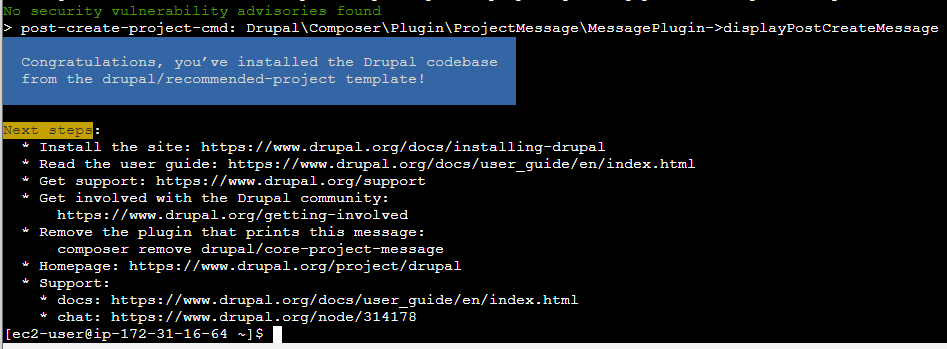
Now install Drupal dependancies according to https://www.drupal.org/docs/installing-drupal/step-2-install-dependencies-with-composer :
cd /drupal
composer install --no-dev
Change the owner of our /drupal/web directory to the apache user so the Apache web server has the permissions it needs :
sudo chown -R apache:apache /drupal/webCreate a tmp directory that we'll configure Drupal to use for temorary file storage :
mkdir /drupal/tmp
sudo chown apache:apache /drupal/tmp
Use the nano file editor to set the file_temp_path for Drupal :
sudo nano /drupal/web/sites/default/default.settings.phpAdd this line to the bottom of the default.settings.php file :
$settings['file_temp_path'] = '/drupal/tmp';Open the Apache configuration file with nano so we can set the document root to correspond to our Drupal installation :
sudo nano /etc/httpd/conf/httpd.confFind where DocumentRoot is set in httpd.conf. If you're using Putty then CTRL+W can help you find it quickly, but if you're using EC2 Instance Connect in a browser then CTRL+W will close your browser window.
Comment out the old DocumentRoot line and add a new line below it specifying /drupal/web as the new DocumentRoot. It should look something like this :
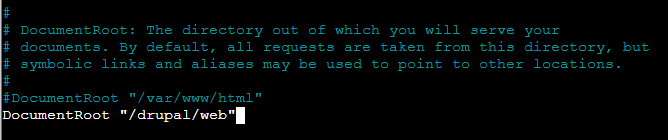
Comment out the line that reads <Directory "/var/www/html"> and replace it with a new line to configure the access on the /drupal/web directory instead. Also change the AllowOverride setting for this directory from None to All. It should look like this :
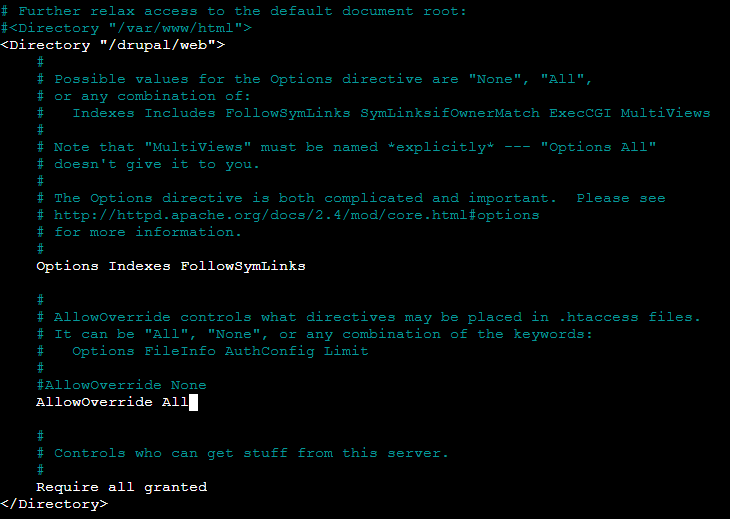
Press CTRL+X, then y, then ENTER to save the changes.
Back at the linux command line, start the Apache web server :
sudo systemctl start httpdSet Apache to run automatically whenever this EC2 instance boots up :
sudo systemctl enable httpdYou've done it, the Drupal codebase is installed and you're ready to configure Drupal via the web installer!
Run the Drupal Web-Based Installer
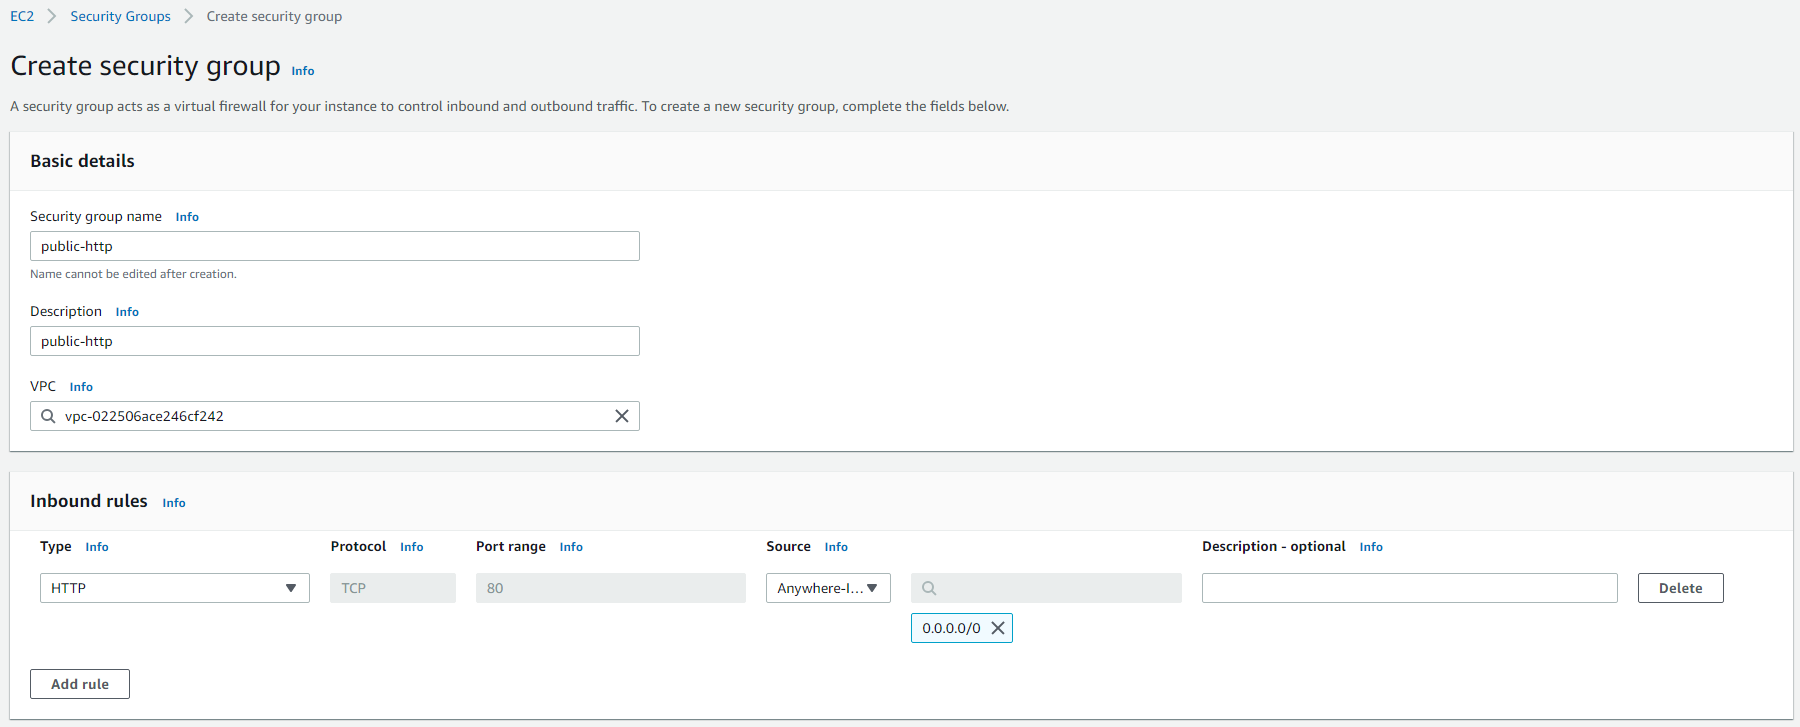
Let's create a security group that allows everyone on the internet to access HTTP port 80 on the assigned instances. We'll use it on our Drupal EC2 instance for now, later we will remove it from our Drupal EC2 instance and route traffic through the load balancer instead.
Go to the EC2 service in the AWS console, select Security Groups in the menu, click Create security group. For Security group name, input a descriptive name. I'll input public-http for the name as well as the Description. In the Inbound Rules section, select HTTP from the drop-down list labeled Type. In the drop-down labeled Souce, select Anywhere-IPv4. Scroll to the bottom of the page and click Create security group.
Go to the EC2 service in the AWS console, select your drupal EC2 instance, and assign the public-http security group we just created. Then copy the public IP address from the EC2 instance summary page. Paste the address into a new browser tab and you should see the Drupal web installation interface.
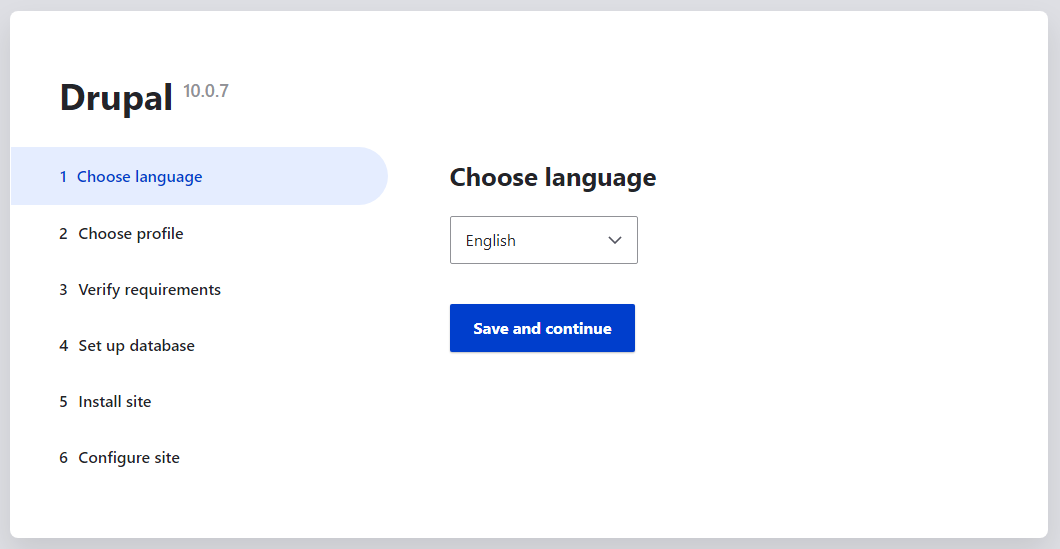
Choose your language, I'm using English, then click Save and continue.
For installation profile, choose Standard and click Save and continue.
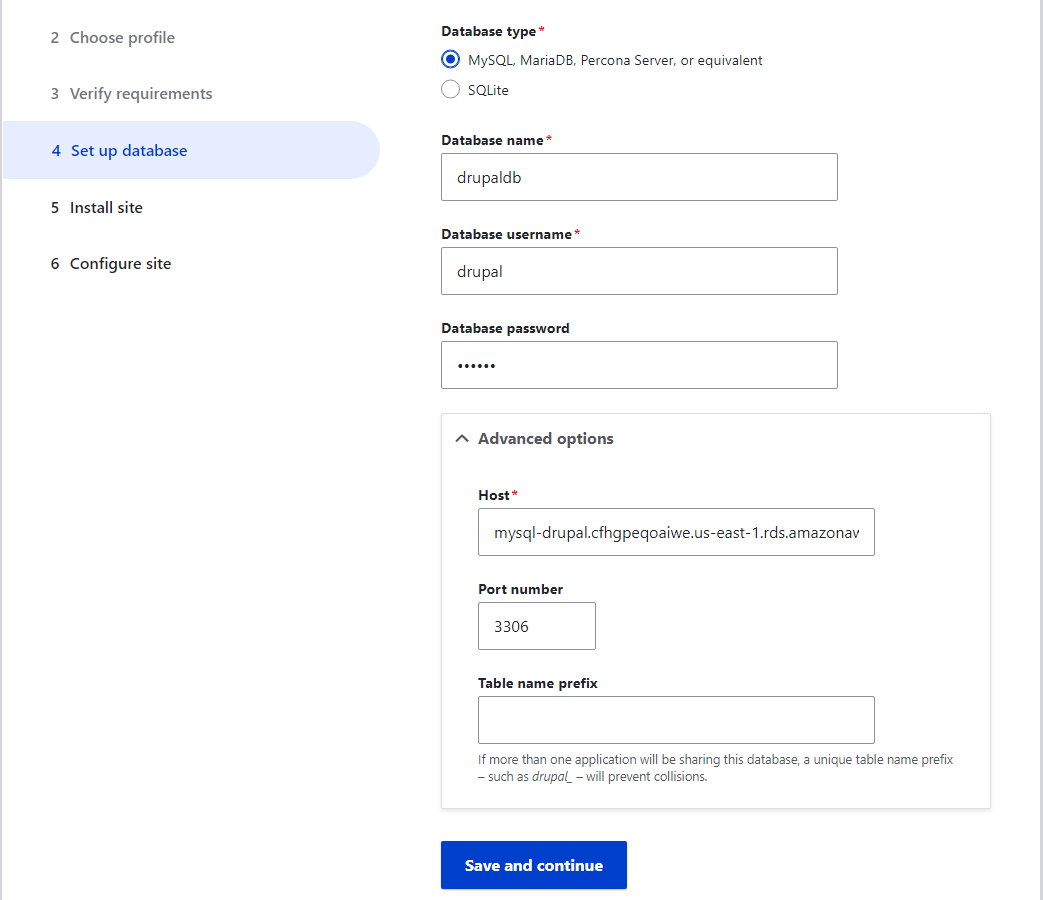
For Database configuration, choose MySQL, MariaDB, Percona Server, or equivalent. In Database name we'll input the name of the database we created in our RDS instance from our MySQL EC2 instance, drupaldb. The Database username we created is named drupal. Enter the password you chose for the drupal database user in the Database password field, then click to expand the Advanced options and in the Host field, replace localhost with the endpoint of your RDS instance. Then click Save and continue.
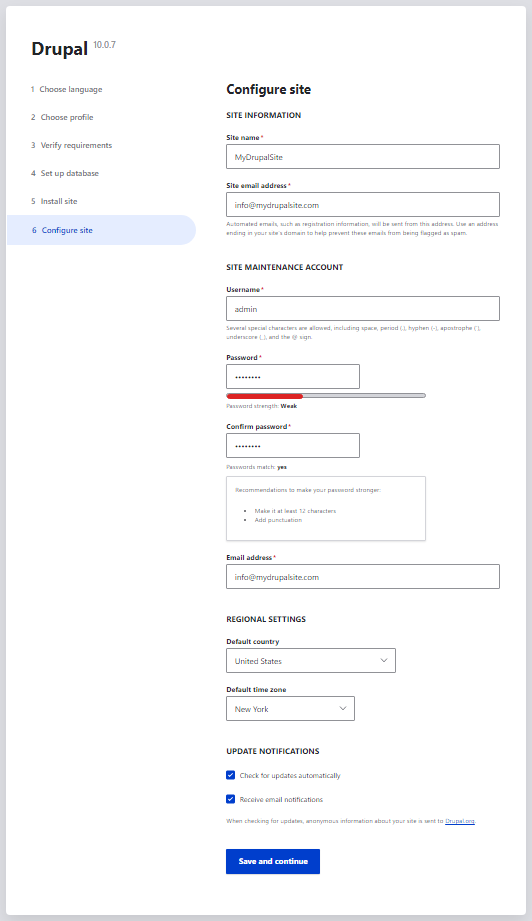
Watch the progress bar as Drupal installation commences. Then we will set up some default settings and the administrator user for our Drupal site. The necessary values will depend on how you want your site setup, and they are pretty self explanatory. Finally, click Save and continue.
After a short final bit of configuration, you should see your new Drupal site in the browser.
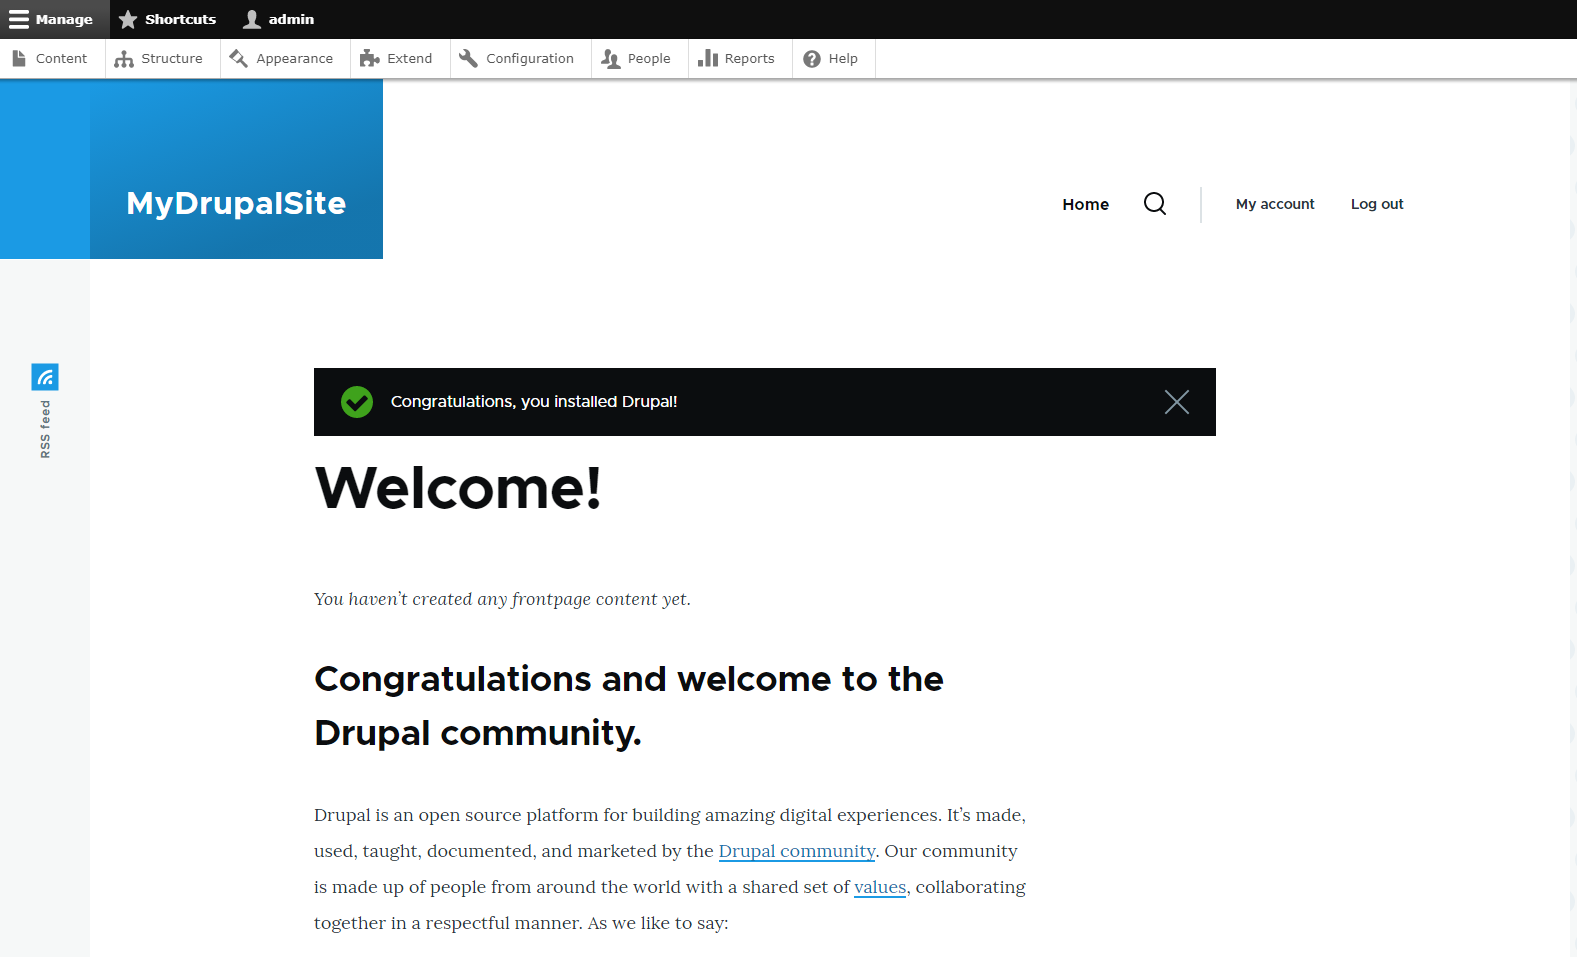
In your Drupal site, if you click on Configuration in the Manage menu, you will see an error message. You can click the link to the status report and see that the error is regarding the configuration of Trusted Host Settings. We'll correct this after we have set up our load balancer.

Create Application Load Balancer (ALB)
Before we create our ALB, let's create a Target Group which will be used to tell the ALB which EC2 instances to send traffic to. In the AWS web console, go to the EC2 service and the click Target Groups under the Load Balancing header in the menu, then click the Create target group button. For Target group name, input drupal-tg. Select the VPC that your drupal EC2 instance is in, then click the Next button.
On the Register targets page, click the box to check on the drupal-a instance created earlier, then click Include as pending below. Then scroll to the bottom of the page and click the Create target group button.
From the EC2 service menu in the AWS console, click Load Balancers. Click on Create load balancer, then click the Create button that is in the Application Load Balancer block. For Load balancer name I am going to use drupal-lb. Make sure to select the same VPC that you created your RDS and EC2 instances in, and select the AZs and subnets that you need. I'm going to use subnets in AZs us-east-1a and us-east-1b for this example.
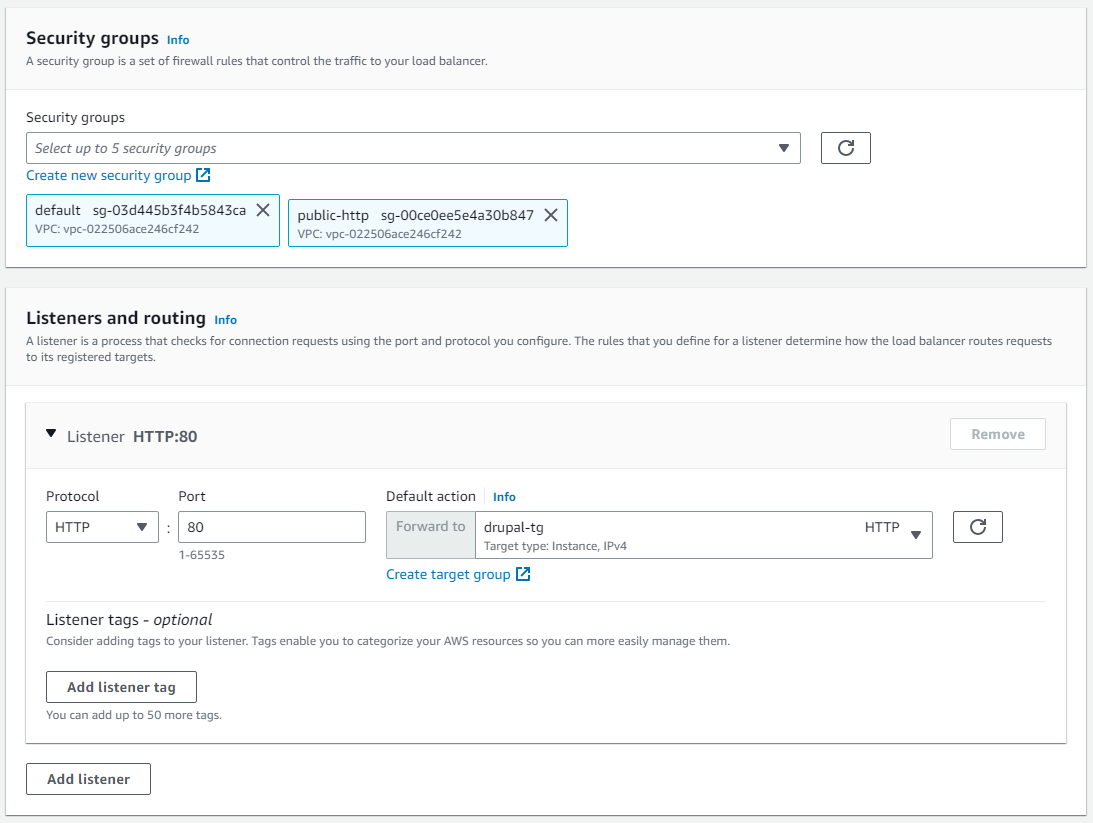
In the Security groups section, add the public-http security group that we created earlier. In the Listeners and routing section, set the Default action drop-down to forward to the target group we just created, named drupal-tg. Finally, click the Create load balancer button at the bottom of the page.
Once the State of your ALB changes from Provisioning to Active, it is ready. Test the load balancer by clicking on it in the EC2 > Load balancers list in the AWS console, then copying the DNS name of the ALB. Paste that into a new browser tab and you should see your Drupal website.
Clone Drupal EC2 Instance Into Separate AZ
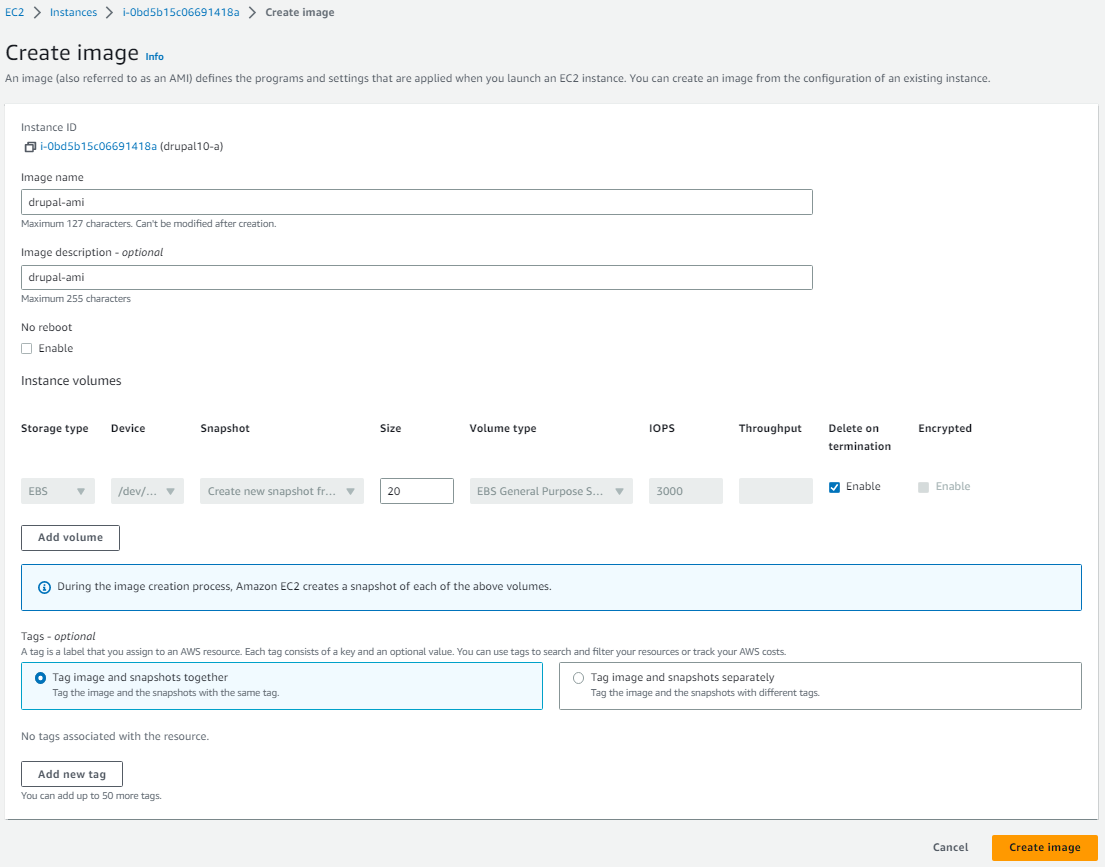
In the EC2 service console, go to Instances and then select your drupal-a EC2 instance. Click on Action, Image and templates, then Create image. This will allow us to create what is called an Amazon Machine Image (AMI).
For Image name and Image description, input drupal-ami. Make sure not to click on the box next to Enable under the No reboot option. Then click the Create image.
In the EC2 web console, select AMIs under the Images heading in the menu. When the Status of the AMI we just chose to create changes from Pending to Available, check the box next to the AMI and then click the button labeled Launch instance from AMI.
For the name, enter drupal-b. For Instance type I will again use t3.micro. Select the same Key pair you used with the other Drupal EC2 instance.
This time make sure to click the Edit button in the Network settings section, and select a subnet that is in a separate AZ than the one the currently running Drupal EC2 instance resides in. Again, it is probably a good idea to select an AZ that corresponds to the subnet group that the RDS instance is running in to help avoid some cross-AZ data transfer charges.
Expand the Advanced details section and once again select ec2-drupal-role for the IAM instance profile. Finally, click the Launch instance button.
In the EC2 section of the AWS web console, click on Instances. Select the drupal-a instance, then click Actions, Security, and Change security groups. Remove the public-http security group and then click Save. Then select the drupal-b instance and once again click Actions, Security, and Change security groups. Add the default security group and click Save.
By now your new EC2 instance should be Running. Click Target Groups in the EC2 menu, then click on the drupal-tg group we created earlier. In the Registered targets section, click the Register targets button. Select the drupal-b instance and click Include as pending below, then click Register pending targets at the bottom of the page.
Refresh the Registered targets section, and after a while you should see both instances showing as Healthy.
Copy the DNS name of your load balancer from the AWS console and paste it into a new browser window. You should see your new Drupal site. You can even shut down each of the EC2 instances running Drupal one at a time to test the multi-AZ redundancy and high availability.
Of course you can also add as many EC2 instances as you like in separate AZs from the AMI we created. You can also add endpoints for your load balancer into as many AZs as you like. The EFS instance already has redundancy and endpoints in every AZ within the region it was created. You can add read replicas for your RDS instance in as many AZs as you like as well. One of those read replicas will automatically become the primary in case there is a failure of the current primary.
Now let's configure Drupal to work with our load balancer to get rid of the Trusted Host Settings error. Connect to the linux command line of any one of your EC2 instances running Drupal.
Open the settings.php file :
sudo nano /drupal/web/sites/default/settings.phpScroll to the bottom of the file and add something similar to this :
$settings['trusted_host_patterns'] = [
  '^drupal-lb-1377068185.us-east-1.elb.amazonaws.com$',
  '^(127(?:\.(25[0-5]|2[0-4][0-9]|[01]?[0-9][0-9]?)){3}$)|(10(?:\.(25[0-5]|2[0-4][0-9]|[01]?[0-9][0-9]?)){3}$)|(192\.168(?:\.(25[0-5]|2[0-4][0-9]|[01]?[0-9][0-9]?)){2}$)|(172\.(?:1[6-9]|2\d|3[0-1])(?:\.(25[0-5]|2[0-4][0-9]|[01]?[0-9][0-9]?)){2}$)',
];
Whether now or later, at some point you will want to replace the line with the host name for the drupal-lb load balancer with the domain name that your Drupal site is or will be running at. You will need a Domain Name Service (DNS) record in place before you do that though, which is beyond the scope of this guide.
The line after that is a big long regular expression that matches any private (not internet routable) IP address. This will allow the health checks performed by the target group to work properly.
Save the changes the the settings.php file and then restart Apache on each EC2 instance by issuing this command :
sudo systemctl restart httpdNow you can only access your Drupal site using the host name you configured in the settings.php file, or by private IP address if you have a VPN into your AWS VPC. You can look at the Status report in Drupal and verify that there are no configuration errors.
There is one last thing I'll show you how to to do properly maintain your multi-AZ Drupal deployment.
Configure Drupal cron Job to be Triggered Remotely
Rather than having the Drupal cron job run on each and every EC2 instance at the same time, we will use AWS Lambda and AWS Event Bridge to trigger the job externally simply by accessing a URL on our Drupal site on a schedule we set. Accessing this URL will get routed to just one of the EC2 instances and that single instance will run the job.
In the AWS console, go to the Lambda service and then click Create a function. For Function name, input drupal-cron. In the drop-down list labeled Runtime, select Python 3.9, then click Create function.
In the function, add a line below the import.json line and input :
import urllib.requestThen in your Drupal site go to Manage, Configuration, Cron.
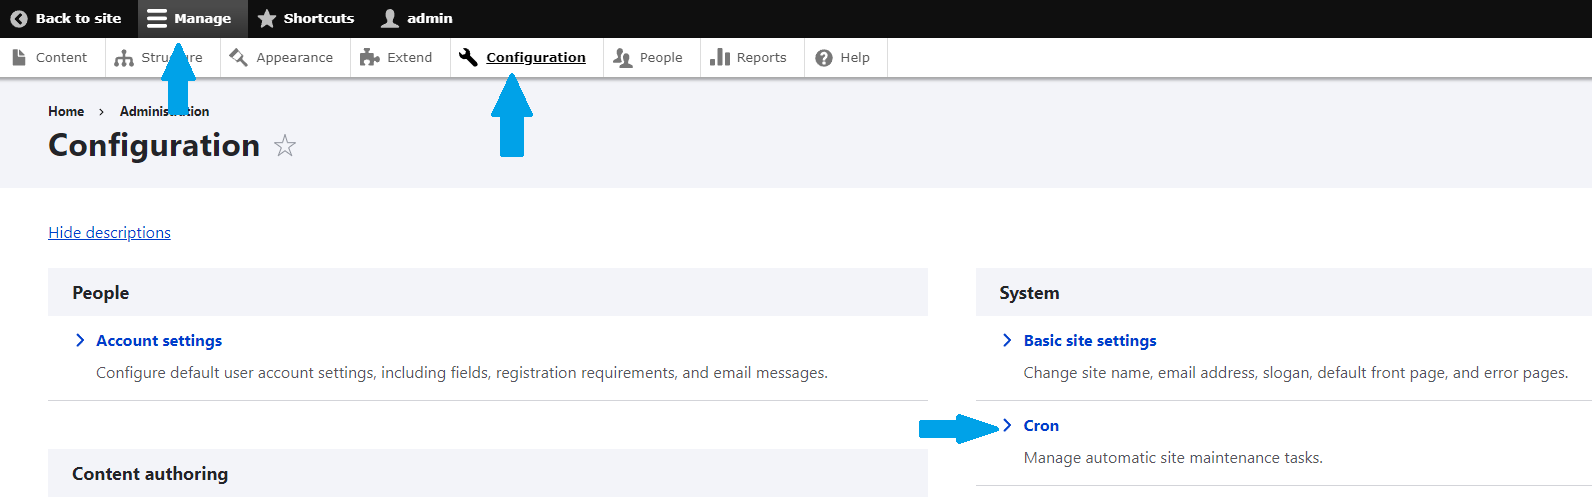
In the drop-down labeled Run cron every, select the option Never, then click Save configuration. Now copy the unique URL shown on your cron configuration page that can be used to run crom from outside the site. Go back to the Lambda function you are creating with Python and, above the return, input :
urllib.request.urlopen('[yourURL]')Now your Lambda function should look something like this :
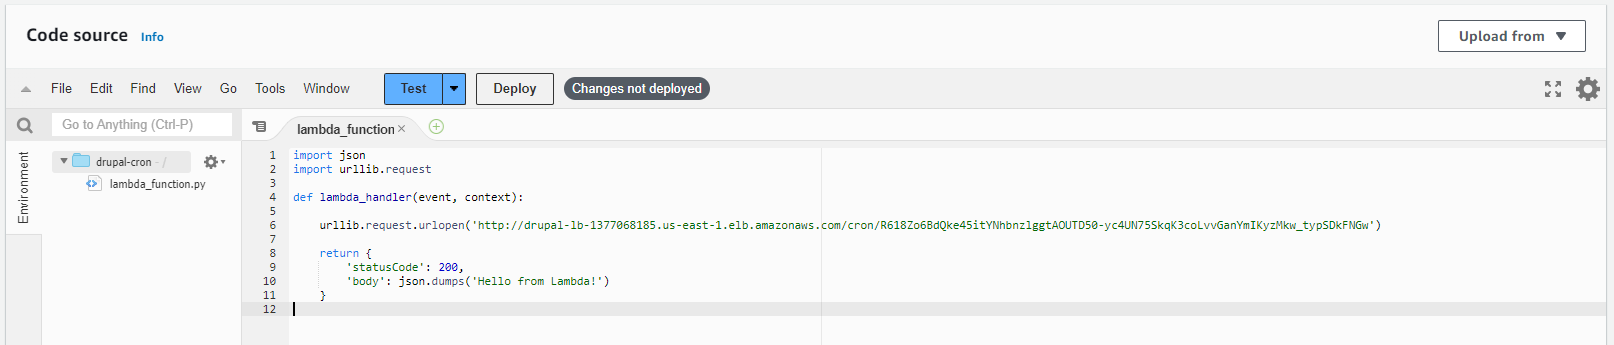
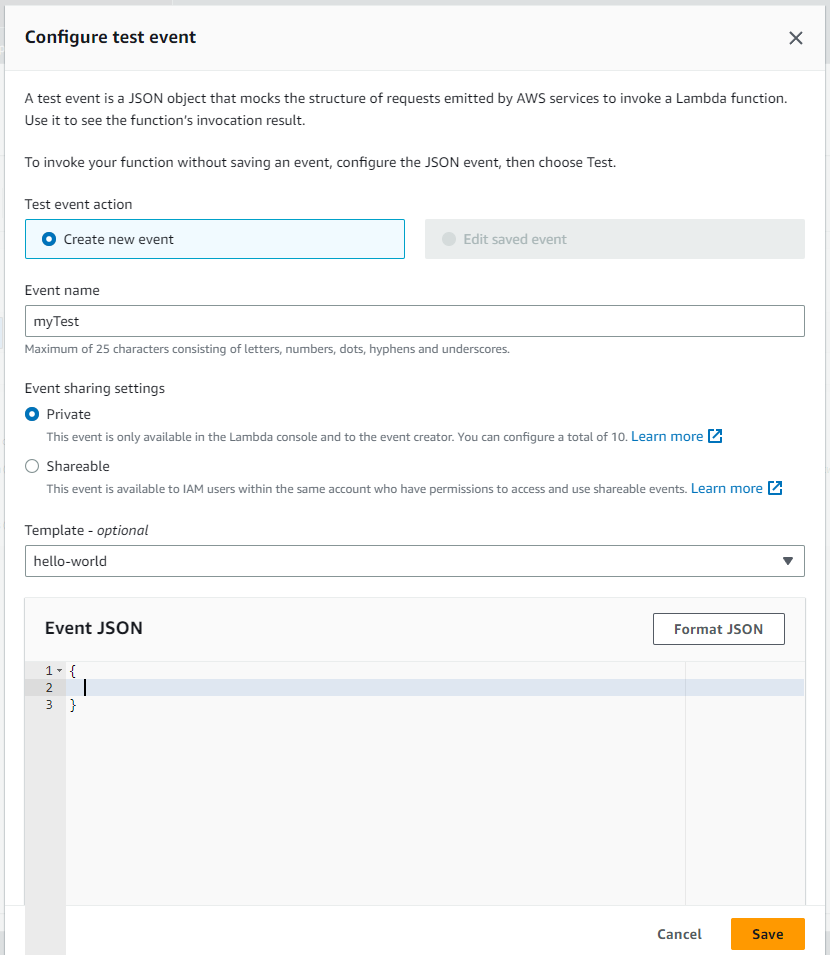
You can test the function by clicking the Test button. In Event name I am inputting myTest. Remove all of the key and value arguments from the JSON text, leaving empty curly brackets, and then click Save.
Now that you've created a test event, clicking the Test button again will execute the test. After executing the test, refresh the cron configuration page in you Drupal site. You should see that the cron job was just executed based on the Last run output there.
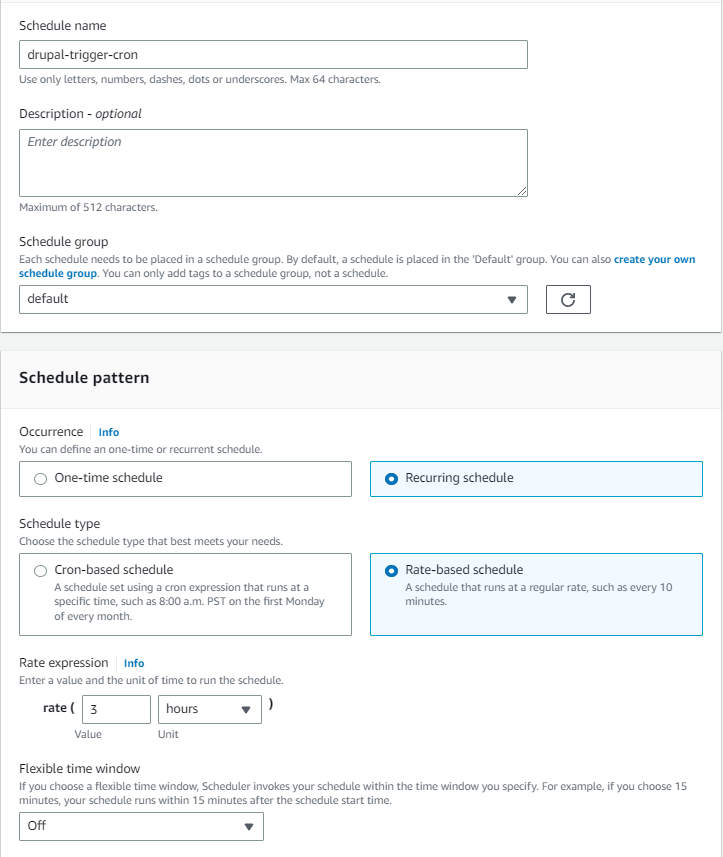
In the edit page of your Lambda function, click the Deploy button. Now go to Event Bridge in the AWS console, select Schedules under the Scheduler header in the menu and click the Create schedule button. For Schedule name, input drupal-trigger-cron. In the Schedule pattern section, select Recurring schedule and Rate-based schedule. Set the Rate expression to 3 hours, set Flexible time window to off, and then click Next.
On the next page, in the Target detail section, select AWS Lambda.
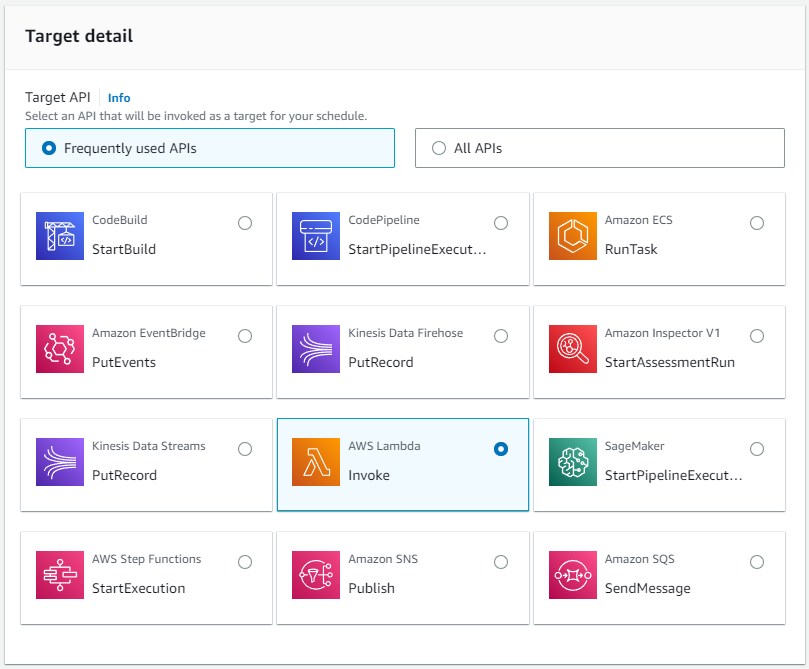
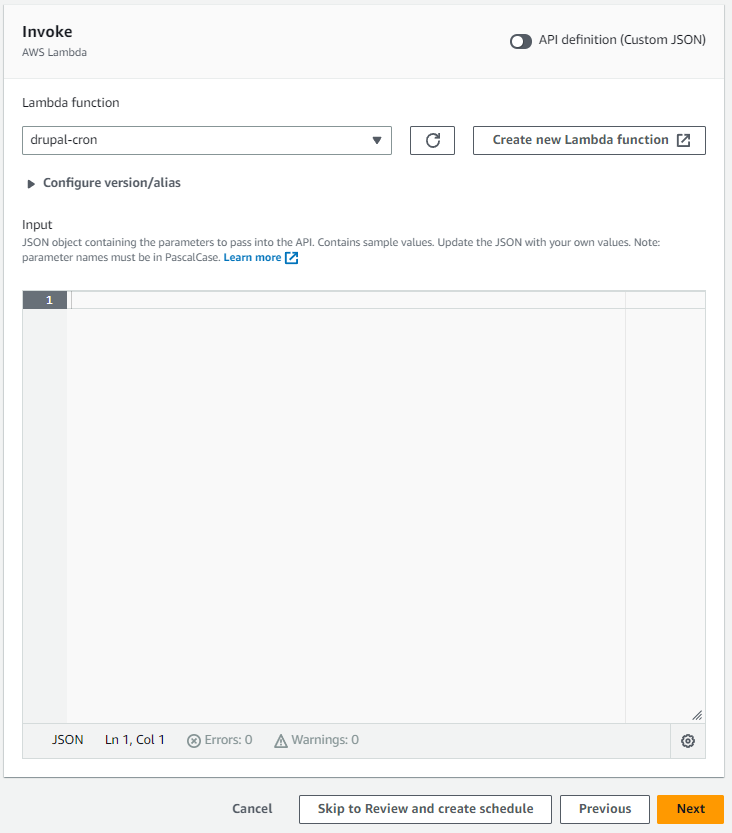
In the Invoke section, select drupal-cron from the drop-down list labeled Lambda function and then click Next.
On the following page, turn off Retry and then click Next. On the final page click Create schedule. Now you'll be able to see on the Drupal cron configuration page that the Lambda function you created is being invoked every three hours. You can see the output of the Lambda invocations in the AWS console, in the Log groups section of the CloudWatch service. You may want to edit the retention period of the /aws/lambda/drupal-cron log group to be a set time period rather than Never expire.
Next Steps
That is basically everything I have for you in this article. Now you have the latest version of Drupal running on linux in a distributed, redundant environment. Now you can begin customizing your Drupal theming and content and installing whatever extensions you may desire. Here are some other things you might consider setting up in your AWS environment for this Drupal deployment. Perhaps I will offer guides for some of these in the future.
- Use EC2 Lifecycle Manager to create a snapshot policy
- Import Apache logs into AWS CloudWatch Logs
- Setup a CloudWatch Dashboard to monitor resources
- Setup CloudWatch Alerts and Simple Notification Service (SNS) notifications
- Add a Web Application Firewall (WAF) to the ALB
- Setup an Auto-Scaling Group for the Drupal/Apache EC2 instances
Until then, enjoy your highly available, geographically distributed, redundant Drupal deployment and it's automatic fail-over capabilities.